Video 2: turn one face into a 50-image LoRA dataset
The video is free. The workflow files and templates for it are in AI Empire Premium, $25/month. $47/month from 20 Oct 2026.
The AI Empire Dataset Maker turns one portrait of your AI character into 50 photos of her, each with a caption, ready to train her character LoRA. In video 2 it runs in ComfyUI on a rented RunPod RTX PRO 6000, takes 30 minutes to 2 hours, and the whole dataset downloads as one .zip.
Affiliate note: RunPod and Fanvue links on this page are referral links. If you sign up through them, AI Empire may earn credits or a commission. You pay the same. How this works.
On this page
- What do you need before you start?
- How do you deploy the Dataset Maker?
- How do you describe her hair and eyes?
- How do you load the workflow and her face?
- Which engine should you pick?
- How do you test a photo and pick a body type?
- How do you generate all 50 photos?
- How do you download the dataset?
- What do the captions look like?
- What can go wrong?
What do you need before you start?
You need her face from video 1, a RunPod account and the files from the Skool classroom. Everything for this video is in Phase 3, in the lesson called “Getting reference images”: the RunPod template, the hair and eyes prompt and the workflow. If you haven’t made her face yet, start with the free course.
- Her face from video 1: one clear, front-facing portrait of your original AI character.
- A RunPod account with credit for a few hours of GPU time.
- The Phase 3 lesson “Getting reference images” in the AI Empire Skool.
The video opens with one tip: if you plan to make money with her, sign up on Fanvue now, even before you use it, because the account takes time to get reviewed. Here’s our Fanvue sign-up link.
Graduates who sign up through our link can get a verification badge and growth help from Fanvue’s team.
How do you deploy the Dataset Maker?
Open the Phase 3 lesson and click the RunPod template. The video uses a strong GPU because the free engine runs on it: the RTX PRO 6000 is the main recommendation, then the RTX 5090. Add a volume disk, deploy, and wait about 10 minutes for the pod to be ready.
Get the template in AI Empire Premium
- Click the RunPod template in the “Getting reference images” lesson.
- Pick the GPU. The video uses the RTX PRO 6000. The RTX 5090 is next on the list.
- Click Add volume, choose Volume disk and add it.
- Deploy. The pod takes about 10 minutes to be ready.
How do you describe her hair and eyes?
Do this while the pod starts. Copy the hair and eyes prompt from the Skool lesson, paste it into ChatGPT or any chatbot, attach her portrait and send it. You get back one short line about her hair and eye colour. Keep it: it goes into the workflow in the next step.
If you don’t have the Skool prompt to hand, this one asks for the same line:
Look at the attached portrait of a woman. Describe ONLY her hair and her eye colour, for an image-generation setting.

Rules:
- One line, lowercase, no full stop, nothing else in your answer.
- Format: <length> <texture> <colour> hair[, <one style detail>], <eye colour> eyes
- Do NOT describe her face, skin, makeup, age, ethnicity, body or clothes.
You get a line like long straight dark brown hair, middle part, brown eyes.
How do you load the workflow and her face?
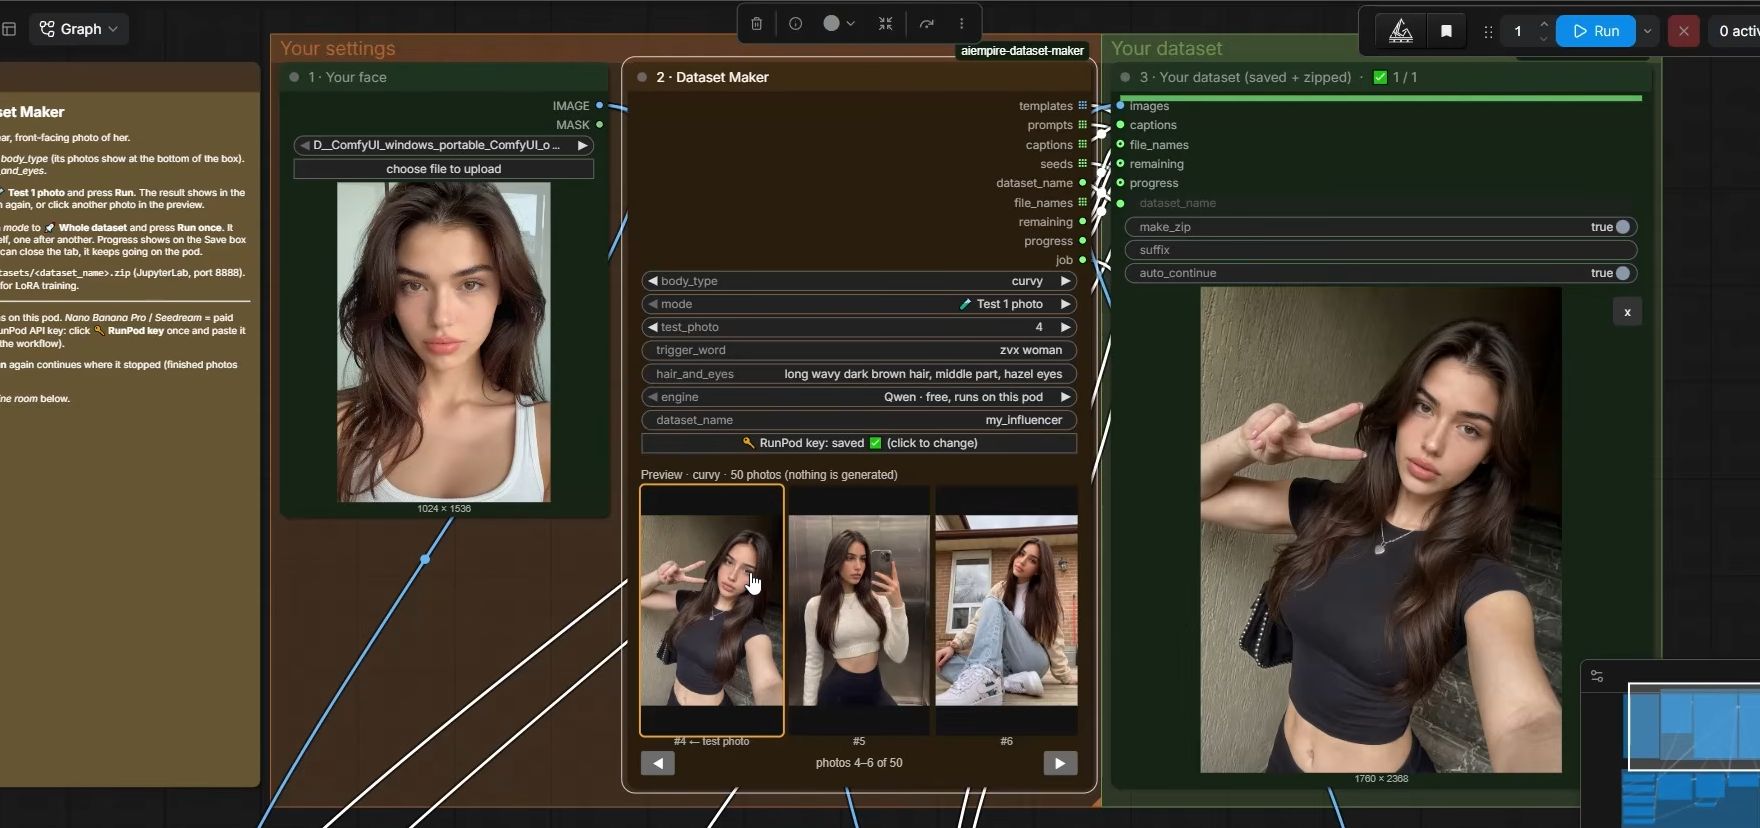
When the pod is ready, open ComfyUI from it. If ComfyUI shows an error the first time, click into the browser’s address bar and press Enter. Then download the workflow from the same Skool lesson and drag it into ComfyUI. Upload her portrait and paste the hair and eyes line from the chatbot.
- Open ComfyUI from your pod. Error on first load? Click the address bar and press Enter.
- Download the workflow from the “Getting reference images” lesson and drag it into ComfyUI.
- Upload her portrait in Your face.
- Paste the line from the chatbot into hair and eyes.
Which engine should you pick?
The video recommends Qwen. It’s free, runs on your pod’s GPU and gives the best quality in the video. Nano Banana Pro and Seedream are the other two options: they run through RunPod’s API and you pay per photo from your RunPod account, so they need a RunPod API key first.
| Engine | Where it runs | What you need |
|---|---|---|
| Qwen (recommended) | Your pod’s GPU | A strong GPU, nothing else |
| Nano Banana Pro | RunPod’s API | A RunPod API key, paid per photo |
| Seedream | RunPod’s API | A RunPod API key, paid per photo |
To use a paid engine: in RunPod, go to Credentials, create an API key and copy it. In the workflow, click the key button, paste the key, then pick Nano Banana Pro or Seedream as the engine. What each one costs per photo is in Nano Banana Pro vs Seedream.
How do you test a photo and pick a body type?
Test before you make all 50. Pick one of the template photos, run it, and check that the result shows her face on that photo. Then pick her body type. There are six: athletic, curvy, petite, busty, thick and plus. The video goes with curvy. Test a few photos until you’re happy.
- Pick a template photo to test on and set mode to Test 1 photo.
- Press Run and check the result: her face, in the template photo’s pose, outfit and place.
- Pick a body type: athletic, curvy, petite, busty, thick or plus. Each one is a set of 50 AI-generated template photos with captions, and you can see what it changes in the test photo.
- Test a few more photos until you’re happy with her.
Why 50 photos? The LoRA in video 3 learns what she looks like from different angles, poses and places. The template photos already cover those, so 50 is plenty.

How do you generate all 50 photos?
Set mode to Whole dataset, check the body type, keep the default trigger word, give the dataset a name and press Run once. In the video this takes 30 minutes to 2 hours. Keep the browser tab open until it finishes. You can minimize it and keep using your computer.
- Set mode to Whole dataset.
- Check the body type is the one you tested.
- Keep the default trigger word,
zvx woman. Every time you type it in a prompt later, you get her instead of a random woman. - Give the dataset name something you’ll recognise, like
my AI girl. It names the zip, so you can tell it apart from other datasets. - Press Run once. It makes all 50 by itself. When ComfyUI’s assets show image 50, it’s done.
How do you download the dataset?
Go back to RunPod, click your pod and open JupyterLab. In the file browser, go to output, then datasets, and download the zip with your dataset name. It holds 50 images and 50 .txt caption files: everything video 3 needs. Then stop the pod so it stops billing for the GPU.
- In RunPod, click your pod and open JupyterLab.
- Go to
output/datasets/and find<your dataset name>.zip. - Download it. Inside: 50 images and 50
.txtfiles. - Stop the pod once you have everything you need.
More on moving files on and off a pod: how to upload and download files on RunPod.
What do the captions look like?
Every image gets a .txt caption file with the same name. It starts with the trigger word, then the template photo’s own caption in a fixed order: shot and pose, outfit, place, light, and framing last. Captions never describe her face or hair, so the LoRA learns those as part of the trigger word.
Whatever the captions leave out, the LoRA learns as part of her. More on that in how many images a LoRA needs and how to caption them.
What can go wrong?
- ComfyUI shows an error when you open it. Click into the address bar and press Enter.
- The test photo looks almost like the template. That can just mean your character looks a lot like the template model. With a very different face, say blonde with blue eyes, you’d see the difference clearly.
- You see more than one zip in
datasets. Test runs under other names make their own files. Download the one with your dataset name. - The tab got closed mid-run. The video keeps the tab open until the run finishes, to be safe. Minimizing it is fine.
- The pod keeps billing. Stop it when you’re done. A stopped pod still bills for its disk, so terminate it once you’ve downloaded everything.
Next: video 3, train her character LoRA on this dataset. New to the series? Start at the free course.
Questions people ask
Can I make a LoRA dataset from one image?
Which GPU do I need?
How long does the dataset take?
Which trigger word should I use?
Do I need a Hugging Face account?
Read next
- Video 1: create your AI influencer's face from scratch
Video 1 of 4: write her prompt with ChatGPT, run the face workflow on a RunPod RTX 4090 and pick her face. Or make faces free in our Discord.
- Video 3: train her character LoRA in AI Toolkit
Step 3 of 4: train your AI character's Krea 2 LoRA in AI Toolkit on an RTX PRO 6000, then make photos of her with Krea 2 Turbo. Every job setting.
- How many images do you need to train a character LoRA?
A character LoRA needs 20 to 50 images. We train on 50. What they should show, how to caption them, how to pick a trigger word, and what goes wrong.