Z-Image Turbo settings: the exact values in our face workflow
Our face workflow runs Z-Image Turbo at 9 steps, CFG 1, sampler dpmpp_2s_ancestral with the FlowMatchEulerDiscreteScheduler, shift 3, at 1024×1536. On a warm RTX 4090 that’s about 5 seconds an image. It’s the face step of creating an AI influencer, and every value is below with the reason behind it.
Affiliate note: RunPod and Fanvue links on this page are referral links. If you sign up through them, AI Empire may earn credits or a commission. You pay the same. How this works.
On this page
- What settings does our Z-Image Turbo workflow use?
- Why CFG 1 and only 9 steps?
- Does Z-Image Turbo use the negative prompt?
- What does shift 3 do?
- Which sampler and scheduler should you use?
- What resolution should you generate at?
- How fast is it, and which GPU do you need?
- How should you prompt Z-Image Turbo?
- What can go wrong?
What settings does our Z-Image Turbo workflow use?
These are the values in the course’s ComfyUI face workflow, node by node, as of October 2026. It loads the bf16 model, the qwen_3_4b text encoder and the ae VAE, adds a LoRA at 0.85, then samples 9 steps at CFG 1. Copy the whole set first, then change one value at a time.
| Node | Setting | Value |
|---|---|---|
| Load Diffusion Model | model, weight_dtype | Z-Image Turbo (bf16), default |
| Load CLIP | clip_name, type | qwen_3_4b, lumina2 |
| Load VAE | vae_name | ae |
| Load LoRA | strength_model | 0.85 |
| ModelSamplingAuraFlow | shift, sampling | 3, flow |
| EmptySD3LatentImage | width × height, batch | 1024 × 1536, 1 |
| KSampler | seed | random (control after generate: randomize) |
| KSampler | steps | 9 |
| KSampler | cfg | 1.0 |
| KSampler | sampler_name | dpmpp_2s_ancestral |
| KSampler | scheduler | FlowMatchEulerDiscreteScheduler |
| KSampler | denoise | 1.0 |
New to loading a workflow file? See how to load a ComfyUI workflow.
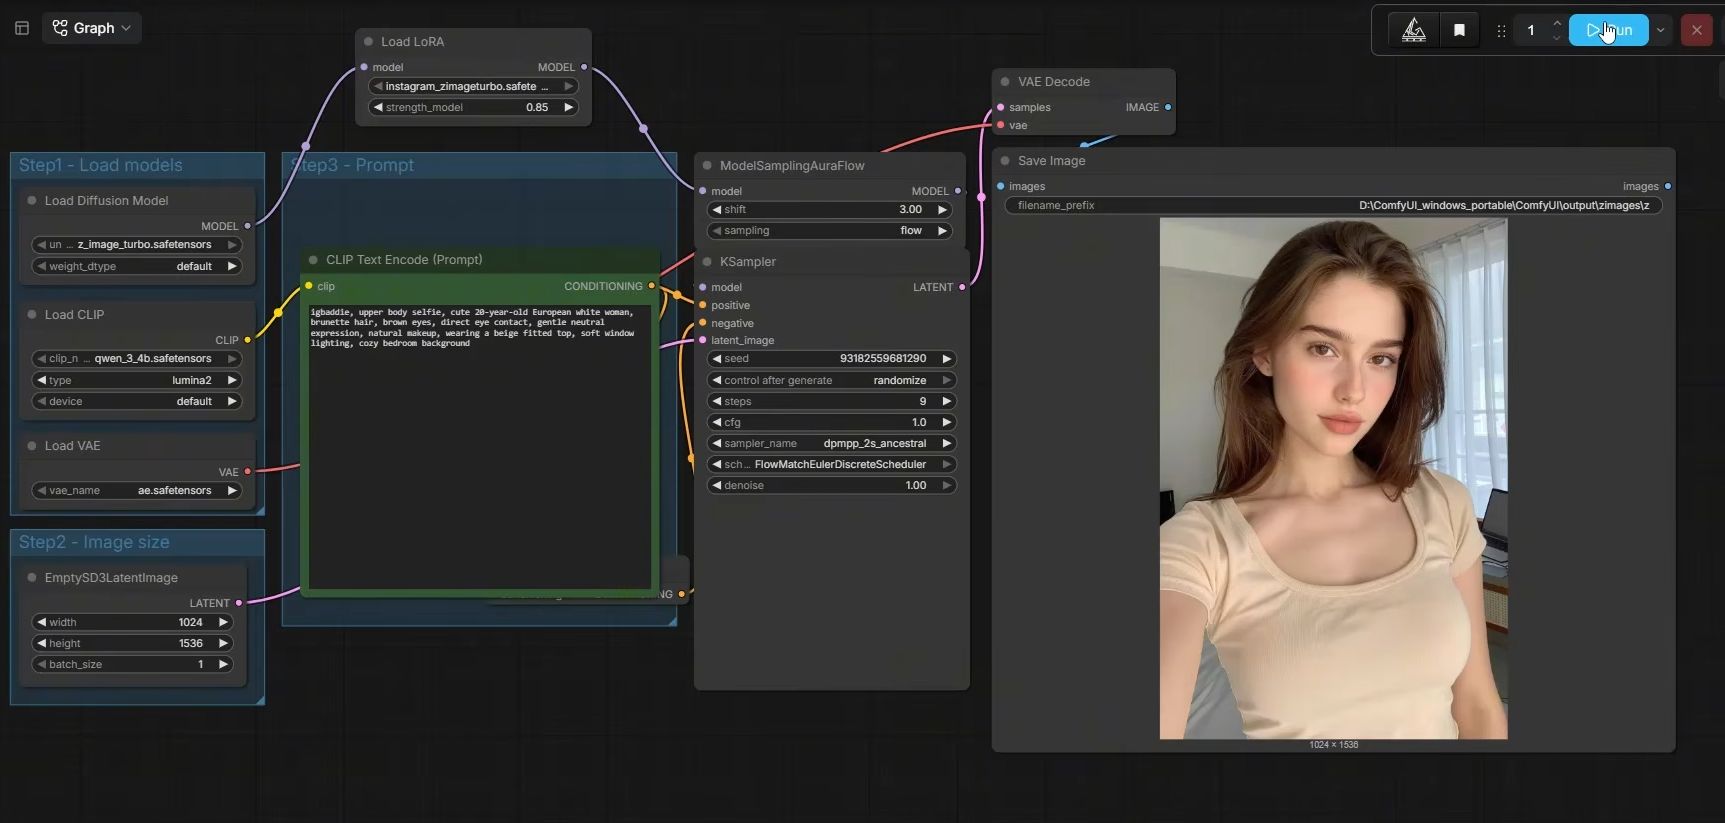
The workflow loads a LoRA at 0.85 on top of the model. Her character LoRA comes later and is trained on Krea 2, so it runs in the Krea 2 Turbo generator from video 3, not in this face workflow. How high to set it is its own topic: LoRA strength, with the values we use.
Why CFG 1 and only 9 steps?
Z-Image Turbo is a distilled model: it was trained to finish an image in a few passes without guidance. Tongyi’s model card recommends 9 inference steps (8 model passes in Tongyi’s own pipeline) and says guidance should be 0 for Turbo. In ComfyUI that’s CFG 1: guidance off.
Raise CFG above 1 and ComfyUI does twice the work per step, once for the positive prompt and once for the negative, so each image takes longer. Our sampler, dpmpp_2s_ancestral, already calls the model about twice per step, so 9 steps in our workflow is roughly 17 model calls, not 8. The base model is a different animal. Here is how the two compare on Tongyi’s own cards (checked 2 Oct 2026):
| Z-Image Turbo | Z-Image (base) | |
|---|---|---|
| Steps | 8 (Tongyi’s code: 9 inference steps) | 28 to 50 |
| Guidance | None (CFG 1) | 3.0 to 5.0 |
| Negative prompt | Not supported | Supported |
| Variety between seeds | Low | High |
Settings don’t transfer between them. A Turbo workflow with base-model numbers, or the reverse, gives bad images. Source: the Z-Image base card.
Does Z-Image Turbo use the negative prompt?
No. At CFG 1, ComfyUI drops the negative conditioning before sampling, so whatever you type there is never used. You can see it in ComfyUI’s sampling code, and Tongyi’s Z-Image card lists negative prompting as unsupported for Turbo. Typing “plastic skin, blurry” into the negative box changes nothing.
So the positive prompt does all the work. Say what you want: the light, the place, the framing. Our prompts end with candid smartphone photo, natural skin texture for exactly this reason. There is no negative prompt to lean on.
What does shift 3 do?
Shift sets how the 9 steps are spread between the noisy start and the clean finish. A higher shift spends more of them early, where the layout and the face are decided. ComfyUI’s ModelSamplingAuraFlow node defaults to 1.73 (checked in its source on 2 Oct 2026); our face workflow uses 3, and we leave it there.
If you want to test it, fix the seed, change only the shift, and compare the images side by side. Changing two things at once tells you nothing.
One catch: the FlowMatchEulerDiscreteScheduler from the ComfyUI-EulerDiscreteScheduler pack sets its own step spacing and ignores the shift value (checked in its code, 2 Oct 2026). With that scheduler, a shift test shows no difference. Run it with a built-in scheduler such as simple.
Which sampler and scheduler should you use?
We use dpmpp_2s_ancestral with the FlowMatchEulerDiscreteScheduler. The sampler is built into ComfyUI. The scheduler isn’t in ComfyUI’s built-in list (checked in its code, 2 Oct 2026), so the workflow needs it from a node pack. If your ComfyUI already lists it under scheduler, there’s nothing to install.
If ComfyUI says the scheduler is missing, or Run fails with “value not in list” on the scheduler, the ComfyUI-EulerDiscreteScheduler pack adds it to KSampler. Its author says it matches the scheduler in the official Z-Image demo. Install custom nodes only from sources you trust: each one is code that runs on your pod. Our face template (the Portrait Generator) already has that pack built in (checked in its Dockerfile, 3 Oct 2026), so on our pod there’s nothing to install.
You’ll see other guides recommend euler or res_multistep. Those run too. We haven’t compared them side by side on our faces, so we won’t rank them. If you try one, change only the sampler and keep the seed fixed.
What resolution should you generate at?
1024×1536, portrait. That’s a tall frame, like a photo taken on a phone held upright, and it leaves enough room for her face and some of the scene. Tongyi’s own examples use 1024×1024, which works too. Keep the batch size at 1 while you test prompts, so each run comes back in seconds.
Once she has a LoRA and you’re making posts, mix the framing: about a third close-up or upper body, a third cowboy or three-quarter, a third full body.
How fast is it, and which GPU do you need?
About 5 seconds per image on a warm RTX 4090 in our setup, and 30 to 60 seconds for the first image after a cold start while the model loads. Tongyi’s card says the model fits in 16 GB of VRAM. A rented 24 GB RTX 4090 is plenty, and a session costs cents.
| GPU | VRAM | RunPod price (2 Oct 2026) | Speed in our workflow |
|---|---|---|---|
| RTX 4090, secure cloud | 24 GB | about $0.74 an hour | about 5 s an image, warm |
| RTX 4090, community cloud | 24 GB | about $0.34 an hour | same card |
At 5 seconds an image, 100 faces is under 10 minutes of GPU time: roughly 10 cents on secure cloud, plus the time the pod takes to boot. Rent the card on RunPod, and stop and terminate the pod when you’re done. The RunPod guide explains why both.
Don’t want to rent anything yet? The free Discord face generator runs on Z-Image Turbo: 10 images a day, about 30 seconds each.
How should you prompt Z-Image Turbo?
Use the course’s order: who she is, a short hair-and-eyes line, then pose, outfit, place, light and framing, ending with candid smartphone photo, natural skin texture. That runs about 40 to 55 words. Once she has a LoRA, the line starts with her trigger word. Never describe her face shape, makeup, skin or body.
A real prompt from the course, with a LoRA loaded:
zvx woman, long wavy dark brown hair, middle part, hazel eyes, sitting on the edge of a pool with one leg angled playfully, coral-orange bandeau bikini with a matching sarong and oversized sunglasses, rooftop pool at a Miami Beach hotel, bright afternoon sun with crisp reflections, cowboy framing, candid smartphone photo, natural skin textureSwap zvx woman and the hair-and-eyes line for your own. The free AI influencer prompt generator builds prompts in this order.
One thing to know before you hunt for a face: Tongyi’s card rates Turbo’s variety between seeds as low. If every new seed gives you a similar woman, change the description (hair, eyes, the place, the light), not just the seed.
What can go wrong?
- If ComfyUI says the scheduler is missing, the FlowMatchEulerDiscreteScheduler isn’t installed: it isn’t built in. Add the ComfyUI-EulerDiscreteScheduler pack (ComfyUI Manager is one route) and restart ComfyUI. Or pick the built-in
simplescheduler and compare it with the original on a fixed seed. - Red nodes or “model not found”. A file is missing or in the wrong folder. Check each loader’s dropdown against the table above. Our guide to missing models in ComfyUI covers where each file goes.
- The workflow errors at Load CLIP, or images ignore your prompt. Check the type field. For qwen_3_4b it must be lumina2.
- You raised CFG and it got slower. Above 1, ComfyUI does twice the work per step. Put it back to 1.
- Every face looks like the same woman. Turbo’s variety between seeds is low. Change the words in the prompt.
- The first image takes a minute. That’s the cold start while the model loads into VRAM. The next ones take about 5 seconds.
- The bill keeps running. You stopped the pod but didn’t terminate it. A stopped pod still bills its volume disk.
Questions people ask
What CFG should I use for Z-Image Turbo?
How many steps does Z-Image Turbo need?
Does Z-Image Turbo support negative prompts?
How much VRAM does Z-Image Turbo need?
Can I use these settings with my own character LoRA?
Read next
- How to create an AI influencer in 2026, step by step
One original face, a 50-image dataset, a character LoRA you own, the AI label on, then growth and Fanvue. Real steps, settings and GPU costs.
- RunPod for AI images: templates, GPUs and what it costs
Rent a GPU by the hour instead of buying one. Which RunPod GPU to pick, what storage costs, how to run ComfyUI, and the stop vs terminate trap.
- Free AI influencer prompt generator
Pick outfit, location, pose, light and camera style and get a ready-to-copy AI influencer prompt in the format that works with a character LoRA. Free.