How to load a ComfyUI workflow, and read one node by node
To load a workflow in ComfyUI, drag its .json file, or a PNG that ComfyUI saved, onto the canvas, or choose Open in the workflow menu (Ctrl+O). Then check that every loader finds its file and press Run. Below, our face workflow read node by node: what each of the 10 nodes you can see does, and the custom node it needs. The RunPod guide covers getting ComfyUI running first.
On this page
- How do you load a workflow in ComfyUI?
- What’s the difference between a workflow file and an image with metadata?
- What does each node in a real workflow do?
- Why does a workflow fail on a standard ComfyUI install?
- Which values can you change safely?
- Where should you keep workflows when you use RunPod?
- Can you use any workflow you find?
- What can go wrong?
How do you load a workflow in ComfyUI?
Three ways: drag and drop the file onto the canvas, open it from the workflow menu, or pick one from ComfyUI’s built-in templates. A workflow file is a .json, but a PNG that ComfyUI saved works too. After it loads, fix any missing models or nodes, then press Run.
- Open ComfyUI. On a RunPod pod, connect to port 8188.
- Load the file. Drag the
.json(or a ComfyUI PNG) from your computer onto the canvas. Or open the workflow menu, choose Open, and pick the file. ComfyUI’s getting started page describes both (checked 2 Oct 2026). The menu label has moved between versions: look for Workflow or File. - Read the warnings. ComfyUI warns you if models are missing and lets you click the warning to see which. Red nodes mean a missing custom node.
- Check each loader. Click every loader node’s file field and make sure it shows a file you actually have.
- Set the prompt and seed, then press Run.
ComfyUI also ships ready-made workflows under Workflow Templates in recent versions. Those check for their models when you open them.
What’s the difference between a workflow file and an image with metadata?
A .json file is only the workflow: the nodes, the wires and every value. A PNG that ComfyUI saved is the finished image with that same workflow tucked inside its metadata. Both load the same way. The catch is that the metadata survives only while nobody re-saves the image.
ComfyUI’s workflow metadata docs say a saved image holds two things: the full workflow graph with its layout, and the prompt ComfyUI actually ran. They also warn that a file re-encoded by another app may lose it.
| You have | Loads the workflow? |
|---|---|
A .json exported from ComfyUI |
Yes |
| The original PNG from ComfyUI’s output folder | Yes |
| The same PNG after Instagram, a chat app’s photo mode or an editor | Usually not: re-compression strips it |
| A screenshot of a workflow | No. It’s a picture; rebuild it by hand |
| A JPG someone posted | Almost never |
For anything you want to keep, export the .json. It’s small, it doesn’t depend on an image, and it’s what you’ll load on the next pod.
What does each node in a real workflow do?
Read any workflow left to right: loaders bring in the model files, model nodes adjust the model, the prompt is encoded, the sampler makes the image, the decoder turns it into pixels, and the last node saves it. Here is the face workflow from the AI Empire course, read that way. Values appear only where they explain the node.
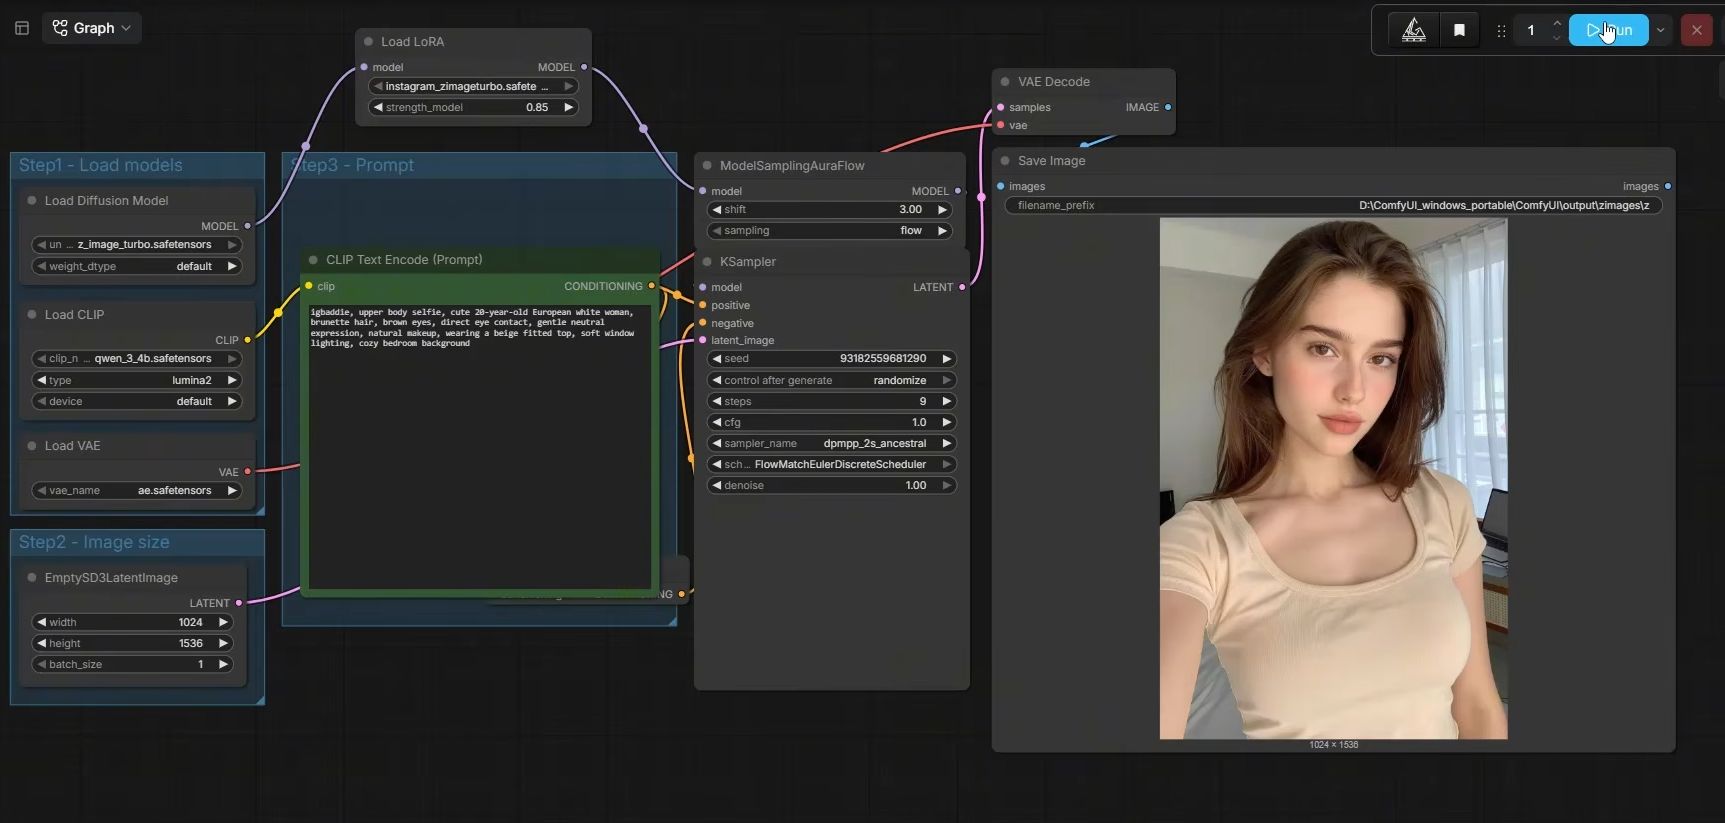
| Node | Role | What to look at |
|---|---|---|
| Load Diffusion Model | Loads the image model, here Z-Image Turbo | The file name must exist in models/diffusion_models |
| Load CLIP | Loads the text encoder that turns your prompt into something the model reads | type must match the model family: lumina2 for this one |
| Load VAE | Loads the VAE, which VAE Decode uses at the end to turn the result into pixels | The file must exist in models/vae |
| Load LoRA | Adds a LoRA on top of the model | strength_model sets how strongly it pulls |
| EmptySD3LatentImage | Sets the image size and how many images per run | Width, height and batch_size |
| CLIP Text Encode | Your prompt | The text box |
| ModelSamplingAuraFlow | Adjusts how the model spreads its work across the steps | shift |
| KSampler | Makes the image: seed, steps, CFG, sampler and scheduler | The scheduler here isn’t built into ComfyUI; a custom node pack adds it |
| VAE Decode | Turns the sampler’s result into an image | Nothing to set |
| Save Image | Saves the PNG, with the workflow inside it | filename_prefix decides where it lands |
The wires show the order. The model runs from the loaders through Load LoRA and ModelSamplingAuraFlow into KSampler. The prompt runs from Load CLIP through CLIP Text Encode into KSampler. KSampler’s result runs through VAE Decode into Save Image.
Every value in this workflow, and why it’s set that way, is in our Z-Image Turbo settings. This page is about reading the graph.
Why does a workflow fail on a standard ComfyUI install?
Because it uses something your ComfyUI doesn’t have: a model file, or a custom node. Our face workflow is an example. Its KSampler uses the FlowMatchEulerDiscreteScheduler, which isn’t built into ComfyUI. On an install without a pack that adds it, pressing Run gives “Value not in list: scheduler”, even when every model file is in place.
First open KSampler’s scheduler list: if FlowMatchEulerDiscreteScheduler is already there, there’s nothing to install. If not, the ComfyUI-EulerDiscreteScheduler node pack adds it to that list. Its page says to install it through ComfyUI Manager (search “erosDiffusion”) or by cloning it into the custom_nodes folder. Install it, restart ComfyUI, then load the workflow again. Our face template (the Portrait Generator) already has that pack built in (checked in its Dockerfile, 3 Oct 2026), so on our pod there’s nothing to install.
Which values can you change safely?
The prompt, the seed and the image size are yours to change. The sampler settings (shift, steps, CFG, sampler, scheduler) were set together for the model. Change one at a time, with a fixed seed, so you can see what it did. Changing several at once is how a working workflow turns into a broken one.
For a character with her own LoRA, our prompts start with her trigger word and a hair-and-eyes line, then the scene; the free prompt generator writes them in that format. Keep batch size at 1 and queue more runs: a bigger batch needs more VRAM, and that’s where out-of-memory errors start.
Where should you keep workflows when you use RunPod?
On your own computer. Workflows you save inside ComfyUI live on the pod’s disk, and terminating the pod deletes that disk unless it’s a network volume. Export each workflow you care about as .json and download it, the same way you download your images and LoRAs before you terminate.
- Export. Open the workflow menu and choose Export. You get a
.jsonfile. - Name it clearly, for example
face-zimage-turbo-1024x1536.json, so you know which is which next month. - Keep it with your LoRAs. One folder per character: her LoRA, her workflows, her best prompts.
- Load it on the next pod by dragging it onto the canvas.
Can you use any workflow you find?
Use workflows from sources you trust and are allowed to use: the course’s templates, ComfyUI’s built-in templates, the official example pages, or ones you built. Don’t load or pass around someone’s paid workflow. Be careful with custom nodes: each one is code that runs on your pod. Ours may need one too: the scheduler pack above.
A workflow from an unknown source can ask you to install several custom nodes in one click. If you don’t know where it comes from, don’t install it, and never on a pod where your LoRA or your passwords live.
Hosted ComfyUI services only run custom nodes from a supported list; see Comfy Cloud vs RunPod.
What can go wrong?
- Red nodes after loading. A custom node type isn’t installed. Install it from a trusted source and restart ComfyUI, or use a workflow that doesn’t need it.
- “Value not in list: scheduler”. No installed pack provides FlowMatchEulerDiscreteScheduler. Install ComfyUI-EulerDiscreteScheduler and restart.
- “Value not in list” on a model field. A model file is missing or named differently. Our guide to ComfyUI missing models has the folder table and the
z_image_turbovsz_image_turbo_bf16name trap. - Nothing happens when you drop a PNG. The image has no workflow in it any more. Get the
.jsonor the original file. - Images save somewhere odd. Check Save Image’s
filename_prefix. Ours still shows the folder path from the computer the workflow was built on. Set a plain prefix likezso images land in ComfyUI’s output folder. - Every image looks the same. The seed is fixed. Set control after generate to randomize.
- The workflow is gone after a new pod. It was saved on the old pod. Export and download next time.
Questions people ask
How do I import a workflow into ComfyUI?
Why does my PNG not load a workflow?
Where are ComfyUI workflows saved?
What do the red nodes mean after loading a workflow?
Read next
- RunPod for AI images: templates, GPUs and what it costs
Rent a GPU by the hour instead of buying one. Which RunPod GPU to pick, what storage costs, how to run ComfyUI, and the stop vs terminate trap.
- ComfyUI missing models: put each file in the right folder, with the right name
Fix ComfyUI missing models and "Value not in list": the right folder for each file, names that match exactly, and uploading models to a RunPod pod.
- How to create an AI influencer in 2026, step by step
One original face, a 50-image dataset, a character LoRA you own, the AI label on, then growth and Fanvue. Real steps, settings and GPU costs.