How to test a LoRA and pick the right checkpoint
To test a LoRA, download 3 checkpoints from a 3000-step run, the 2000, the 2500 and the final file, and generate the same prompt with the same seed on each. Too early, the face is close but not quite her. Too late, the skin goes plastic and the same background or outfit creeps in. In video 3 of our course, the 2500 file was the keeper. Picking that file is step four of building a consistent AI character.
Why test a LoRA at all?
Training doesn’t hand you one LoRA. It hands you a series of saved versions, each a bit more trained than the last. Early ones haven’t learned her face yet. Late ones have learned it plus things you didn’t want. Only testing shows where the good stretch is, and it’s different for every dataset.
The course’s training job runs 3000 steps and saves a checkpoint every 250, and it keeps 12 step saves. You don’t need to test them all. Video 3 downloads three from the end of the run, 2000, 2500 and the final file, and compares only those.
How do you test a LoRA, step by step?
Download three checkpoints, load them one at a time in your generator, and run the same prompt with a fixed seed. Change nothing else between runs. Put the three images side by side and judge them. In video 3, all three looked close, and the 2500 file was the one he kept.
- Download the checkpoints. In AI Toolkit, go to Queue, click View all and open the finished job. Download the file without a step number (the final one, 3000 steps), plus the
_000002500and_000002000files. Download them before you terminate the pod. - Upload them to your generator into ComfyUI’s
models/lorasfolder with JupyterLab, then press R in ComfyUI so they show up. Keep the step number in each file name. - Fix the seed. In the sampler, set “control after generate” to fixed. Our generator template is set to randomize, which ruins a comparison.
- Leave strength at 0.9, our generator template’s default.
- Run your test prompt with the final file. Note the seed.
- Swap the LoRA file to 2000, then 2500. Same prompt, same seed, same everything.
- Keep the one that looks most like her without plastic skin. Copy it somewhere safe, then delete the files you won’t use so you don’t mix them up later.
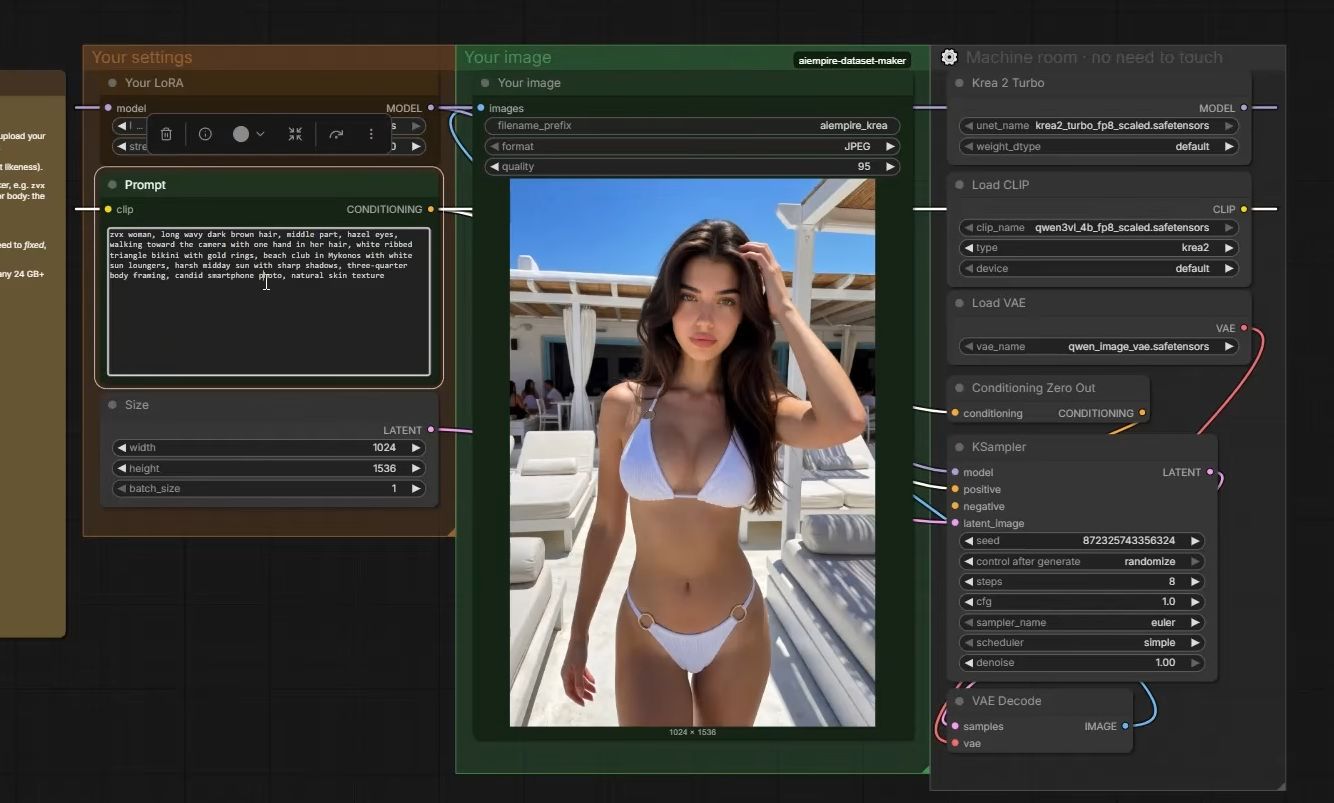
Use the generator settings you’ll actually post with. In our current Krea 2 Turbo generator template that’s 8 steps, CFG 1, euler/simple, 1024×1536. A different base model has its own values.
Which prompts should you test with?
One prompt is the core test, as in the video: a scene that isn’t in her dataset, in the course’s prompt format. If you want a stricter check, our extra advice is to add two more: one close-up, one cowboy shot, one full body in all, each with a different outfit, place and light.
Swap zvx woman and the hair-and-eyes line for your own character’s. This one is the core prompt:
zvx woman, long wavy dark brown hair, middle part, hazel eyes, close-up selfie holding an iced coffee, cream ribbed knit sweater, small cafe table by a window with plants, soft overcast window light, close-up framing, candid smartphone photo, natural skin textureOptional extras, our own advice rather than what the video shows. Close-ups show if the face is really her; full body shows if it holds when the face is small.
zvx woman, long wavy dark brown hair, middle part, hazel eyes, leaning on a metal railing and laughing toward the camera, black leather jacket over a white tee and blue jeans, city rooftop terrace with string lights, warm golden hour sun from the side, cowboy shot, candid smartphone photo, natural skin texturezvx woman, long wavy dark brown hair, middle part, hazel eyes, walking across a crosswalk mid-step with a tote bag on one shoulder, beige trench coat over a grey knit dress and white sneakers, busy downtown street, bright overcast daylight, full body framing, candid smartphone photo, natural skin textureA good rule of thumb: pick scenes that are not in your dataset. If the test prompt matches training images, an overfit checkpoint looks perfect because it’s copying. The free AI influencer prompt generator writes more in this format if you want to swap one out.
How do you judge the test images?
Ask three questions of each image: is it clearly her, did the prompt’s outfit, place and light come through, and does the skin look like a phone photo, not plastic. A checkpoint passes when all three say yes. If more than one passes, keep the one that looks most like her.
The table below is an example of what the test can look like, not results from a real run.
| Checkpoint | Is it her? | Did the prompt come through? | Verdict |
|---|---|---|---|
| 2000 | Yes | Yes | Candidate |
| 2500 | Yes | Yes | Candidate: looks most like her, keep |
| Final (3000) | Yes | Yes, but skin smoother, a bit plastic | Too far |
The final file should be the strongest, but it isn’t always. On some datasets it’s the right one; on others 2000 already looks best. The point of testing is to see which, not to assume.
The “too far” signs in detail, and what causes them, are in our LoRA overfitting guide. If none of the three looks like her, stop testing and work through why a LoRA isn’t working instead.
What strength should you test at?
Test at 0.9, our generator template’s default, and keep it the same for all three files. If two checkpoints are close, our extra check is to repeat those two at 0.8 and 1.0. If the face falls apart at 0.8, it’s undertrained; if it repeats things at 1.0, it’s close to overtrained.
That range is where our templates run character LoRAs: 0.9 by default, 0.8 looser, 1.0 strongest. Testing across it means the checkpoint you pick works at whatever value you end up posting with. What each value does is in our LoRA strength guide.
Are the trainer’s sample images enough?
No. They’re a progress check, not the test. The course’s job makes a sample for each of its 10 sample prompts every 500 steps, at 1024×1280, using the trainer’s own sampling setup. Your posts come from the generator, with its own settings. Use the samples to catch a run going wrong early, then test properly in the generator.
Why samples and generator images can look so different is covered in why a LoRA isn’t working.
Check the save setting before you train, not after. The course’s job sets Max Step Saves to Keep to 12. AI Toolkit’s job screen defaults to 4 (new-job defaults), and its example config also keeps only the last 4 (max_step_saves_to_keep: 4, example config, checked 2 Oct 2026). With 4, a 3000-step run still has 2000 and 2500, but nothing before 2000. With 12, every 250-step save stays.
What can go wrong?
- The seed is on randomize. Every image differs for random reasons and you can’t compare checkpoints. Set it to fixed and note the number.
- You only test the final file. It isn’t always the best. Too many steps can make her face look plastic. Test 2000 and 2500 too.
- You test with dataset scenes. An overfit checkpoint copies them perfectly and looks like the winner. Use scenes the LoRA hasn’t seen.
- You mix up the files. Two checkpoints renamed
her_lora.safetensorsand you no longer know which is which. Keep the step numbers. - You terminate the pod first. Terminating deletes everything not on a network volume (RunPod docs, checked 2 Oct 2026). Download the checkpoints first.
- Close-ups pass, full body drifts. The face can be perfect up close and drift when it’s small. That’s a dataset gap; the fix is more full-body images, covered in our guide to LoRA dataset size.
Questions people ask
How many checkpoints should I test?
Why use the same seed for every checkpoint?
Can I test a LoRA inside the trainer?
What strength should I test at?
Read next
- LoRA not working? 7 checks, cheapest first
LoRA doing nothing, giving the wrong face or not loading in ComfyUI? Seven checks, cheapest first, from the file to the dataset.
- How to keep your AI character's face the same in every photo
Prompts, reference images, a character LoRA, or a LoRA trained on a dataset you generate. What each holds, what it costs, and when you need a LoRA.