Video 4: build a private Telegram bot that makes photos of your character
The video is free. The workflow files and templates for it are in AI Empire Premium, $25/month. $47/month from 20 Oct 2026.
You build a private Telegram bot for your AI character in four parts: a serverless endpoint on RunPod, a bot from @BotFather, 5 values in a text file and a free Cloudflare Worker that connects them. Then you text the bot a prompt and her photo comes back in about 20 seconds, at about 1 cent for every 3 photos.
Affiliate note: RunPod and Fanvue links on this page are referral links. If you sign up through them, AI Empire may earn credits or a commission. You pay the same. How this works.
On this page
- What do you need before you start?
- How do you deploy the RunPod endpoint?
- How do you make the bot in Telegram?
- Which 5 values does the bot need?
- How do you set up the Cloudflare Worker?
- How do you connect the bot and get the first photo?
- How much does each photo cost?
- How do you write prompts for it?
- What can go wrong?
- What comes after video 4?
What do you need before you start?
You need her LoRA from video 3, trained on Krea 2, and its trigger word. You also need a Telegram account, a RunPod account with some credit and a free Cloudflare account. The endpoint template, the bot code and the variable names are in the Skool classroom. Those resources are part of AI Empire Premium.
- Her LoRA
.safetensorsfile from video 3 and its trigger word. - A Telegram account.
- A RunPod account with credit.
- A free Cloudflare account.
How do you deploy the RunPod endpoint?
Open the Telegram generator template from the Skool lesson and click Deploy. Untick the GPUs you don’t want, so the endpoint uses the 24 GB card at about $0.69 an hour first and the one at about $1 an hour only as a fallback. You pay those rates only while it generates, never while idle.
- Open the template from the Skool lesson and click Deploy.
- Untick the other GPUs. Put the 24 GB GPU at about $0.69/hr first. The one at about $1/hr only runs when the first isn’t available, which is rare (prices as of October 2026).
- Create the endpoint. It needs no environment variables: the bot sends everything with each job.
- Leave the tab open. You need the endpoint ID from it later.
Get the template in AI Empire Premium
How do you make the bot in Telegram?
With @BotFather, Telegram’s own bot for making bots. Send it /newbot, pick a name and then a username. BotFather replies with a token: copy it into a text file, because it’s the first of the 5 values the Worker needs. The username is public, but that doesn’t matter: only you can use the bot.
- In Telegram, open @BotFather and send
/newbot. - Give the bot a name, then a username. Any name works.
- Copy the token BotFather sends back into a text file.
Which 5 values does the bot need?
The bot token, the endpoint ID, a RunPod API key, a link to her LoRA file and your Telegram ID. Collect all 5 in your text file before you open Cloudflare. In the Worker, each one becomes a variable, and the variable names in this table must be spelled exactly as shown.
| Variable | Value | Where you get it |
|---|---|---|
TELEGRAM_BOT_TOKEN |
The bot token | @BotFather, step above |
RUNPOD_ENDPOINT_ID |
Your endpoint ID | Your endpoint’s page on RunPod |
RUNPOD_API_KEY |
A RunPod API key | Your RunPod account settings |
LORA_URL |
A share link to her LoRA file | Dropbox |
OWNER_ID |
Your Telegram ID | @userinfobot |
- Endpoint ID. Copy it from the endpoint page you left open.
- API key. Create a new API key in your RunPod account and copy it.
- LoRA link. Upload her
.safetensorsfile to Dropbox and copy its share link. Use Dropbox, as the video does. - Your Telegram ID. Open @userinfobot in Telegram and send
/start. It replies with your ID. If you leaveOWNER_IDempty, your own bot also replies with your ID when you message it.
OWNER_ID is what keeps the bot private: it only makes photos for the IDs in it. To add another account of yours, put both IDs in, separated by a comma.
How do you set up the Cloudflare Worker?
Cloudflare runs the bot for free. You make a Hello World Worker, replace its code with the bot code and deploy. Then you add the 5 variables under Settings and deploy again. The bot code is in the Skool lesson and in the public GitHub repo, so copy it from either and paste the whole file.
- Log in to Cloudflare and go to Compute, then Workers & Pages.
- Click Create application, then Start with Hello World, then Deploy.
- Open the code, replace all of it with
worker.jsfrom the Skool lesson or the GitHub repo, and click Deploy. - Go to Settings, then Variables and Secrets, and click Add variable for each of the 5 values in the table.
- Check every name against the table, then deploy.
Optional variables: LORA_STRENGTH (default 0.9), WIDTH (default 1024) and HEIGHT (default 1536). Leave them out unless you need them.
How do you connect the bot and get the first photo?
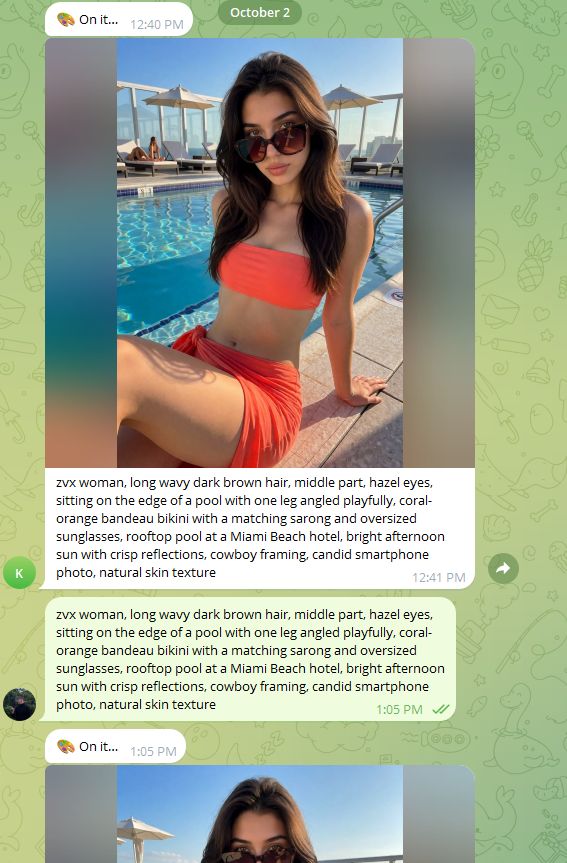
Open your Worker’s URL with /setup on the end. It can take a while to load, so wait for it. When it shows “Bot connected!”, open your bot in Telegram and send it a prompt. The first photo after a break takes longer while the GPU starts. After that, each one takes about 20 seconds.
- Copy your Worker’s URL from Cloudflare and add
/setupto the end, likehttps://<your-worker>.workers.dev/setup. - Wait until it shows “Bot connected!”.
- Open your bot in Telegram and send it a prompt.
How much does each photo cost?
About 1 cent for every 3 photos (the owner’s figures, October 2026). The endpoint bills per second only while it makes a photo, and a photo takes about 20 seconds. While the bot sits idle you pay $0, and the Cloudflare Worker is free. You set it up once and never launch a pod or upload a workflow again.
RunPod shows the per-second price of your endpoint, so you can check the math yourself. How serverless billing works is in our RunPod for AI images guide.
How do you write prompts for it?
Start with her trigger word, then one short hair-and-eyes line, then the scene: photo type, pose, outfit, place, light and framing. Don’t describe her face shape, makeup, skin or body, because the LoRA already knows her face. If you leave off “candid smartphone photo, natural skin texture”, the bot adds it for you.
zvx woman, long wavy dark brown hair, middle part, hazel eyes, sitting at a cafe table by the window, holding a coffee cup with both hands, cream knit sweater and light blue jeans, plants and brick wall behind her, soft morning daylight, medium shot from across the table, candid smartphone photo, natural skin textureThe bot doesn’t add the trigger word, so type it every time. The free prompt generator builds prompts in this format.
What can go wrong?
- The bot doesn’t answer. Open
/setupagain and check it says “Bot connected!”. If not, checkTELEGRAM_BOT_TOKEN. - The bot replies
⚠️ Something went wrong: .... The text after the colon says what failed. Check that the variable it points to is spelled exactly as in the table and that its value is right, then deploy again. - The LoRA link doesn’t work. In the video, a Google Drive link failed and a Dropbox link worked. Use a Dropbox share link to the
.safetensorsfile itself. - The bot won’t make photos for you. Your Telegram ID isn’t in
OWNER_ID, or there’s a typo in it. - The first photo is slow. That’s normal after a break: the GPU has to start first. The next ones take about 20 seconds.
- Not her face. Start the prompt with exactly the trigger word you trained with. Check her LoRA was trained on Krea 2. Then try LoRA strength at 1.0 with
LORA_STRENGTH.
What comes after video 4?
Video 4 is the last part of the free series. You now have a face, a dataset, a LoRA trained on Krea 2 and a bot that makes photos of her from your phone. To go back over any step, the whole series is on the free course page, in order, starting with video 1.
- Previous: video 3, train her character LoRA.
- The whole series: the free course.
Questions people ask
How much does the bot cost to run?
How long does a photo take?
Can other people use my bot?
Which LoRA works with the bot?
Do I need a Hugging Face account?
Read next
- Video 3: train her character LoRA in AI Toolkit
Step 3 of 4: train your AI character's Krea 2 LoRA in AI Toolkit on an RTX PRO 6000, then make photos of her with Krea 2 Turbo. Every job setting.
- RunPod for AI images: templates, GPUs and what it costs
Rent a GPU by the hour instead of buying one. Which RunPod GPU to pick, what storage costs, how to run ComfyUI, and the stop vs terminate trap.